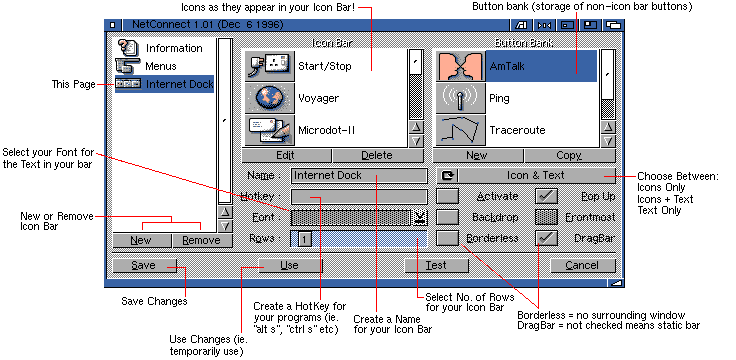
You can launch the NetConnect prefs from the icon bar menu or from its Workbench icon.
The NetConnect prefs allow you to:
When you select "Internet Dock" within the NetConnect prefs list you will be presented with an editable icon bar GUI.

This area allows you to control, manage and customise your icon bar.
With the excellent MUI drag&drop facility you can add icons to the icon bar with complete ease. Literally drag the icon you want from the Button Bank to the Icon Bar section (as shown here) and the new icon/s will appear within your icon bar.
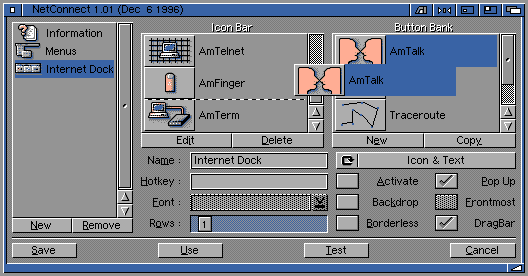
To make the icon appear within your Icon Bar press SAVE or USE and the icon bar on your
Workbench will be updated. If you press
![]()
You can remove icons the same way. Either press "delete" and the icon will dissapear or drag the icon from the Icon Bar to the Button Bank. Again, press SAVE or USE and the icons will now dissapear from the icon bar on Workbench.
Creating new icons is also very easy. Click on "New" and a default (and temporary) NetConnect icon will appear, with a Edit Icon GUI to configure this icon.
![]()
Configuring an icon is more than easy. The essential commands from the above GUI are to,
Press "Okay" and the icon will be updated within the Button Bank.
Here is a real example of how to launch programs from your icon bar. In this example we are gong to use Disk Salv.
Now you have one of two options. EITHER:
OR:
If you double-click on this icon the "Edit Icon" window will appear.
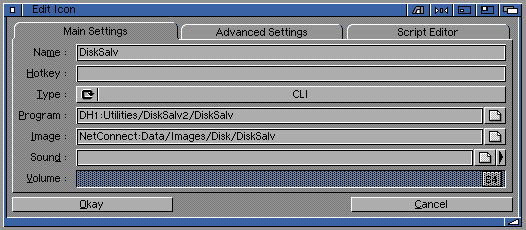 DiskSalv Example Information
Now the icon should appear within the icon bar and, when clicked, will launch Disk Salv!
![]()
The same formula can apply to most other programs.
More advanced settings can be configured as follows:
The essential commands on this page are,
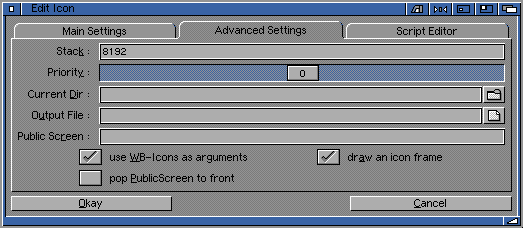 Advanced Settings GUI
The Script Editor allows you to create scripts (similar to running an iconx controlled script) for your programs.
Scripts are necessary for two reasons:
To create and launch a script you need to select "DOS Script" within the Main Settings and then create a script name within "Program:"
We, for example, have a script drawer which contains a number of scripts for various purposes. If we created a script for Brilliance, it would look something similar to this:
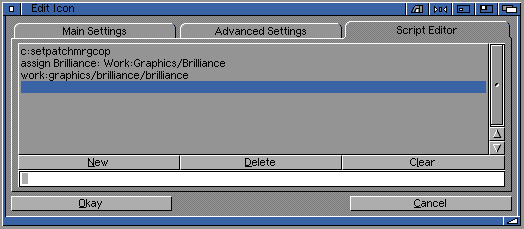 Brilliance Script Example
The information for the new Brilliance script would be entered in this box as shown below. For example, we would create a "brilliance.script" within our scripts: area on our hard drive:
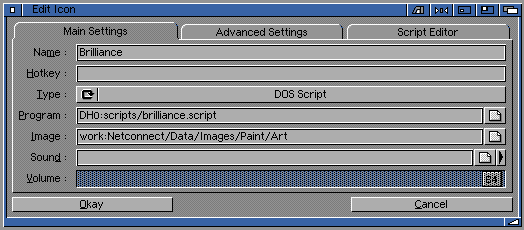 Naming the Script File
To alter an existing icon, just double-click on an icon within either the Icon Bar or the Button Bank. The Edit Icon GUI will appear.
Go to the previous, next, chapter, table of contents.